Understanding Cards
Kilowhat is the configuration tool for your controller. With Kilowhat you can set up the messages that your controller will send, where the messages will be sent, save your configuration files, define the behavior of your components, configure the messages to which your feedback will respond, and more.
What are Cards?
Section titled “What are Cards?”Each of the cards represents a component in your controller. Select one card to access its configuration. Or activate auto selection, move a component and the corresponding card will be selected. The cards also provide useful visual information while you work on your configuration.
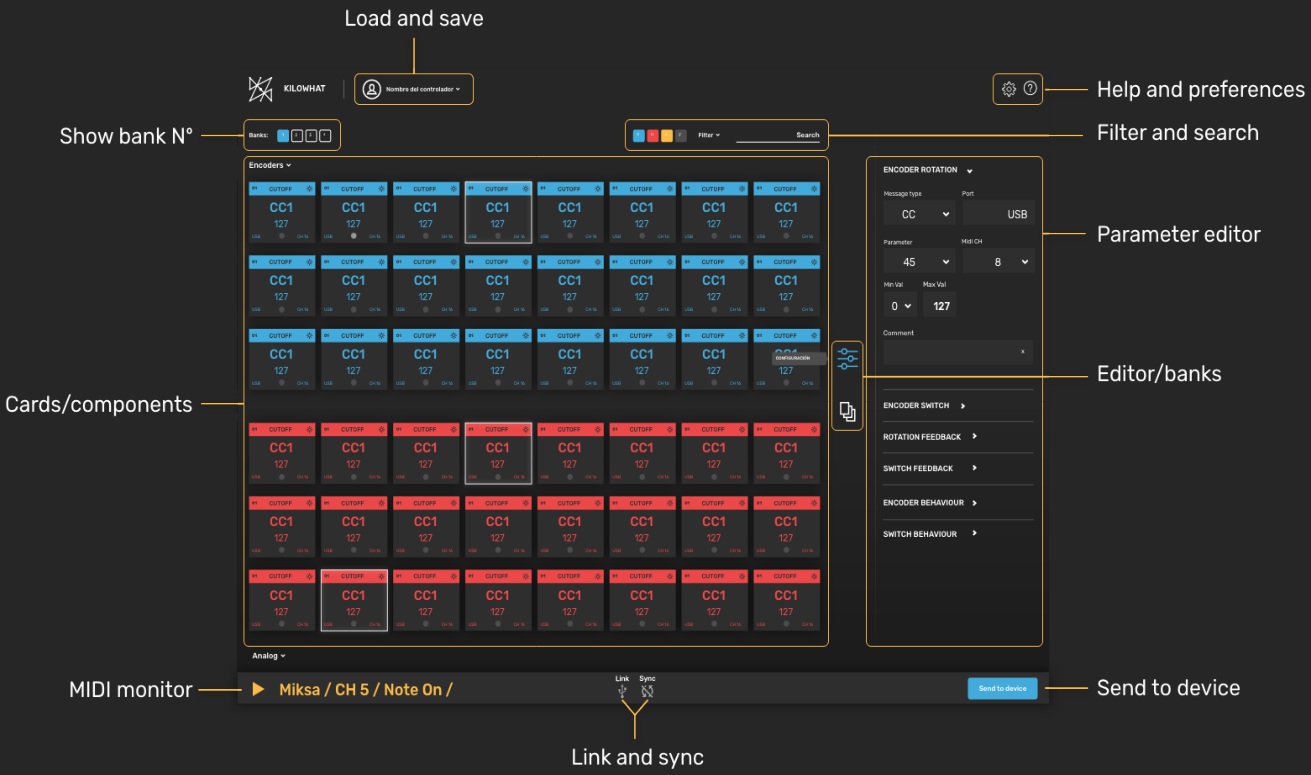
The interface is organized into several key areas:
- Load and save - Save and load configuration files
- Show bank number - Display which bank you’re currently editing
- Cards/components - The main card grid showing all your controller components
- Filter and search - Tools to find specific components quickly
- Help and preferences - Access settings and documentation
- Parameter editor - Configure the selected component
- Editor/banks - Switch between editing modes
- MIDI monitor - View real-time MIDI activity
- Link and sync - Connection status indicators
- Send to device - Upload your configuration
Cards Breakdown
Section titled “Cards Breakdown”Each card displays essential information about its corresponding component at a glance.
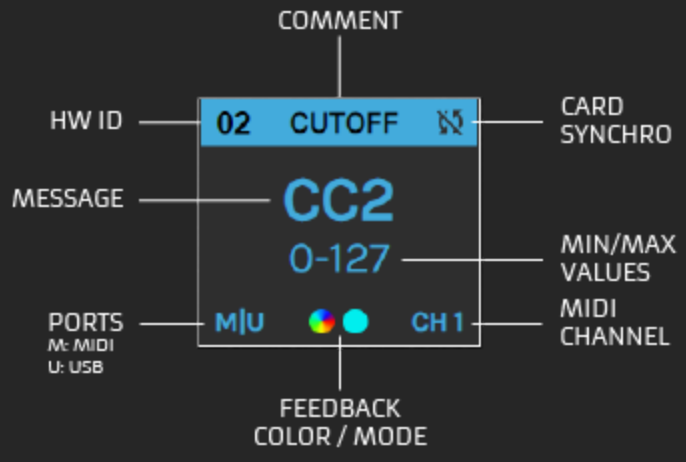
A card shows the following information:
| Element | Description |
|---|---|
| HW ID | Hardware ID - unique identifier for each component |
| Comment | User-defined reference name for the parameter |
| Card Synchro | Indicates if the card is synced with the controller |
| Message | The MIDI message type (CC, NOTE, etc.) |
| MIN/MAX Values | The minimum and maximum values for the message |
| Ports | Output ports (M: MIDI, U: USB) |
| MIDI Channel | The MIDI channel used by this component |
| Feedback Color/Mode | Visual indicator of feedback configuration |
Hardware ID
Section titled “Hardware ID”This number shows the hardware ID, unique for each component in your controller. You can find this number in the top left corner of each card.
Feedback Color / Mode
Section titled “Feedback Color / Mode”Here you can see the color configured for the feedback of the component corresponding to the card.
- Encoder cards: You’ll see 2 circles - one for the rotary encoder’s ring, and one for the encoder switch
- Digital cards: You’ll see the color configured for the button
The feedback indicator shows the color mode:
- Solid blob = FIXED COLOR mode with the configured color
- Color wheel = VALUE TO COLOR mode (color changes based on received MIDI value)
Comment
Section titled “Comment”Shows a user-defined reference name for a parameter. You can edit this name by typing in the “comment” box inside the configuration tool box of each component.
Message Type
Section titled “Message Type”Shows the message type for this component:
| Code | Message Type |
|---|---|
| NOTE | MIDI Note Message |
| CC | MIDI Control Change Message |
| PC | MIDI Program Change Message |
| PC+ | MIDI Program Change Increment and send |
| PC- | MIDI Program Change Decrement and send |
| NRPN | MIDI Non Registered Parameter Number Message |
| RPN | MIDI Registered Parameter Number Message |
| PB | MIDI Pitch Bend Message |
| KB | Keyboard action |
| BANK | Component configured as a Bank shifter |
MIN - MAX Values
Section titled “MIN - MAX Values”Shows the minimum and maximum values defined for the message. For example, “0-127” indicates the full MIDI value range.
Shows the output ports for the message:
- M = MIDI (DIN5 port)
- U = USB
- M|U = Both ports
MIDI Channel
Section titled “MIDI Channel”Shows the MIDI channel (1-16) used by this component.
Card Selected
Section titled “Card Selected”You can select a card to edit by either:
- Clicking on the card directly
- Moving a component on your controller (with Auto-Select enabled)
The selected card will be highlighted in Kilowhat, and its configuration options will appear in the parameter editor on the right side.
Next Steps
Section titled “Next Steps”- Filters and Search - Learn how to find components quickly
- UI Elements - Understand the status indicators and navigation
- Encoders - Configure rotary encoder components