UI Elements
Kilowhat’s interface includes several important status indicators and navigation elements that help you understand your controller’s state and access key features.
Hardware Status
Section titled “Hardware Status”The hardware status indicators are located at the bottom of the Kilowhat interface and show the current state of your connection and synchronization.
Sync Indicator
Section titled “Sync Indicator”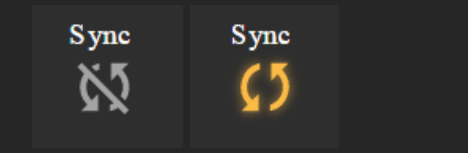
The Sync indicator shows if the current state of the configuration in Kilowhat is different from the one stored in the controller.
| Icon Color | Status |
|---|---|
| Yellow | Controller is in sync - configuration matches |
| Gray | Controller is not in sync - configurations differ |
To get back in sync, you can either:
- Get from Controller - Load the configuration from the controller into Kilowhat
- Send to Device - Upload the current Kilowhat configuration to the controller
Link Indicator
Section titled “Link Indicator”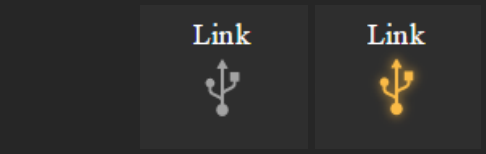
The Link indicator shows if your controller is physically connected to Kilowhat.
| Icon Color | Status |
|---|---|
| Yellow | Controller connected |
| Gray | Controller not connected |
Navigation Icons
Section titled “Navigation Icons”Icon / Banks
Section titled “Icon / Banks”
Kilowhat provides two main editing modes, accessible via icons in the interface:
Banks Icon
Section titled “Banks Icon”Click the banks icon to access Bank configuration where you can:
- Edit the number of banks
- Select which components will be used to shift banks
- Configure bank color
- Set global bank MIDI channel
- And more bank-related settings
Message Configuration Icon
Section titled “Message Configuration Icon”Click the message configuration icon to access the component message settings. Select a card to edit its content, including:
- Message type (CC, Note, etc.)
- MIDI channel
- Parameter number
- Min/Max values
- Feedback settings
Help Button
Section titled “Help Button”
The Help button provides quick access to:
- This reference manual
- A quick intro video tutorial
- Support resources
Preferences
Section titled “Preferences”
Access the Preferences panel to configure both controller options and Kilowhat application settings.
Devices / Refresh
Section titled “Devices / Refresh”Select the device that matches your controller’s name. This setting allows Kilowhat and your controller to communicate with each other.
If you don’t see your controller’s name in the Devices list:
- Unplug and replug your controller
- Click on the refresh icon to rescan the devices
- Select your controller from the updated list
Kilowhat Options
Section titled “Kilowhat Options”MIDI Monitor
Section titled “MIDI Monitor”Toggle whether to display MIDI activity in the MIDI Monitor section at the bottom left of the screen. This is useful for:
- Verifying your controller is sending messages
- Debugging MIDI routing issues
- Confirming message types and values
Auto-Select Card
Section titled “Auto-Select Card”When enabled, this setting automatically selects and scrolls to the corresponding configuration card when you move or press any component on your controller.
Benefits of Auto-Select:
- Quickly find which card corresponds to any physical control
- No need to manually search through cards
- Bank changes on the controller also select the matching bank in Kilowhat
MIDI Monitor
Section titled “MIDI Monitor”The MIDI Monitor displays real-time MIDI activity from your controller. It has two views:
Normal View
Section titled “Normal View”A compact, single-line display showing the most recent MIDI message:
MiniblockV2 / CH 1 / CC / 41This shows: Source / Channel / Message Type / Value
Extended View
Section titled “Extended View”Click on the normal view to expand it into a detailed table showing:
| Column | Description |
|---|---|
| SOURCE | The device sending the message |
| CH | MIDI channel (1-16) |
| MESSAGE | Message type (CC, Note, etc.) |
| PARAM | Parameter number |
| VALUE | The value sent |
The extended view shows a history of recent messages, making it easier to track multiple interactions.
Send to Device
Section titled “Send to Device”The “Send to Device” button uploads your current Kilowhat configuration to the controller. Always use this after making changes to ensure your controller has the updated settings.
Important notes:
- Wait for the sync indicator to turn yellow after sending
- Don’t disconnect the controller during transfer
- Large configurations may take a few seconds to transfer
Status Bar Summary
Section titled “Status Bar Summary”The bottom status bar contains several key elements from left to right:
- MIDI Monitor - Real-time message display
- Link indicator - Connection status
- Sync indicator - Configuration sync status
- Send to Device - Upload button
Keeping an eye on these indicators helps ensure your configuration work is saved and synchronized properly.
Related Pages
Section titled “Related Pages”- Understanding Cards - Learn about card elements
- Filters and Search - Find components quickly
- Getting Started - Initial setup guide