Ableton Live Setup
This guide walks you through setting up your Yaeltex controller with Ableton Live for optimal performance, including proper MIDI configuration and LED feedback.
Initial Setup
Section titled “Initial Setup”- Connect your Yaeltex controller via USB
- Open Ableton Live
- Open Preferences with
Cmd + ,(Mac) orCtrl + ,(Windows) - Navigate to the Link/Tempo/MIDI tab
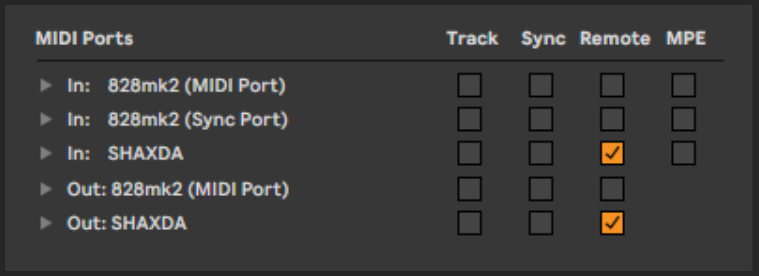
MIDI Configuration
Section titled “MIDI Configuration”In the Link/Tempo/MIDI preferences, locate your Yaeltex controller in the MIDI Ports section and configure it as follows:
Input Settings
Section titled “Input Settings”| Setting | Enable | Purpose |
|---|---|---|
| Track | Yes | Allows recording MIDI from your controller |
| Remote | Yes | Enables control of Ableton parameters |
Output Settings
Section titled “Output Settings”| Setting | Enable | Purpose |
|---|---|---|
| Track | Yes | Sends MIDI feedback to controller LEDs |
Your preferences should look like this:
Using MIDI Learn
Section titled “Using MIDI Learn”Ableton’s MIDI Learn feature makes it easy to map your controller to any parameter:
- Press
Cmd + M(Mac) orCtrl + M(Windows) to enter MIDI Map Mode - Click on the parameter you want to control
- Move the encoder, press the button, or adjust the fader on your controller
- Press
Cmd + M/Ctrl + Magain to exit MIDI Map Mode
The mapping is now active and will be saved with your Live Set.
Advanced Integration
Section titled “Advanced Integration”For more sophisticated control, consider these options:
Control Surface Scripts
Section titled “Control Surface Scripts”Ableton supports custom Control Surface scripts that provide:
- Automatic parameter mapping
- Visual feedback on the controller
- Session view navigation
- Transport control
Check the Yaeltex website for available Control Surface scripts for your device.
Max for Live
Section titled “Max for Live”If you need custom behavior, Max for Live devices can:
- Create complex MIDI routing
- Generate dynamic LED feedback
- Build custom control schemes
See the Feedback documentation for more details on LED feedback implementation.
Common Issues
Section titled “Common Issues”Controller Not Appearing in Preferences
Section titled “Controller Not Appearing in Preferences”- Check that the USB cable is properly connected
- Try a different USB port (preferably USB 2.0)
- Restart Ableton Live
- On Windows, verify the driver is installed correctly
No LED Feedback
Section titled “No LED Feedback”If your controller LEDs are not responding to Ableton:
- Verify Track output is enabled in MIDI preferences
- Check that feedback is configured in Kilowhat (see Feedback documentation)
- Ensure the MIDI channel matches between Ableton and your controller
Controls Not Responding
Section titled “Controls Not Responding”If your controller sends MIDI but Ableton doesn’t respond:
- Confirm Remote input is enabled
- Check that you have a valid MIDI mapping
- Verify the control is not mapped to a disabled or hidden parameter
Stuck or Incorrect LED States
Section titled “Stuck or Incorrect LED States”- Reload the Live Set
- Toggle the Track output off and on in preferences
- Power cycle your controller
For additional troubleshooting, see Common Issues.
Recommended Workflow
Section titled “Recommended Workflow”- Create a template: Set up your MIDI mappings in an empty Live Set and save it as your default template
- Use feedback colors: Configure LED colors in Kilowhat to match your Ableton color scheme
- Group related controls: Map related parameters (like a synth’s filter controls) to adjacent encoders or faders
- Test thoroughly: After mapping, test all controls to ensure they work as expected before a performance